
I just upgraded my tiny 512GB NVMe SSD to a 4TB one on each node. I started with the host pve3. Here are the steps.
Prerequisites
- You have a new NVMe SSD of at least the same size.
- You have a way to copy 2 NVMe SSDs (I opted for an ORICO NVME SSD Clone device)
- Check that your Proxmox cluster is OK with
pvecm status - Check
ceph statusshowsHEALTH_OK
Glossary
- LVM : Linux Volume Manager
- PV : LVM Physical Volume
- VG : LVM Volume Group
- LV : LVM Logical Volume
- OSD : Ceph Object Storage Daemon
- PVE : Proxmox Virtual Environments or Proxmox VE
- PVE GUI : Proxmox VE web interface
Procedure
- Before any operation on ceph, it’s always useful to dedicate a console to watch a
ceph -wcommand. - Set the
nooutandnorebalanceglobal flags for your OSDs. You can do it from the Proxmox VE GUI or command line. This will turn theceph statustoHEALTH_WARN:noout,norebalance flag(s) set - Safely shutdown the Proxmox node (use the GUI)
- Copy the old NVMe to the new one. You can also use
ddif you have USB NVMe adapters. - Start Proxmox node with the new disk. From now, all the next steps will be made online, with services and ceph running.
- Use fdisk to rearrange partitions. You might have to delete & recreate the last partition.
root@pve3:~# fdisk /dev/nvme0n1

Welcome to fdisk (util-linux 2.36.1).
Changes will remain in memory only, until you decide to write them.
Be careful before using the write command.

GPT PMBR size mismatch (1000215215 != 7814037167) will be corrected by write.
The backup GPT table is not on the end of the device. This problem will be corrected by write.
Note the GPT PMBR size mismatch showing that the new disk is 8 times bigger. List the partitions with p
Command (m for help): p

Disk /dev/nvme0n1: 3.64 TiB, 4000787030016 bytes, 7814037168 sectors
Disk model: CT4000P3SSD8
Units: sectors of 1 * 512 = 512 bytes
Sector size (logical/physical): 512 bytes / 512 bytes
I/O size (minimum/optimal): 512 bytes / 512 bytes
Disklabel type: gpt
Disk identifier: 6D06B1F4-8489-4C56-92D3-1EFCA1183DBD

Device           Start        End   Sectors   Size Type
/dev/nvme0n1p1      34       2047      2014  1007K BIOS boot
/dev/nvme0n1p2    2048    1050623   1048576   512M EFI System
/dev/nvme0n1p3 1050624 1000215060 999164437 476.4G Linux LVM
Hopefully, and in most of the cases, the PV with the Linux LVM is at the end. So we need to carefully note the ‘Start’ of the partition, delete it, and recreate it since we want to use the new free space.
Command (m for help): d
Partition number (1-3, default 3): 3

Partition 3 has been deleted.

Command (m for help): n
Partition number (3-128, default 3):
First sector (1050624-7814037134, default 1050624):
Last sector, +/-sectors or +/-size{K,M,G,T,P} (1050624-7814037134, default 7814037134):

Created a new partition 3 of type 'Linux filesystem' and of size 3.6 TiB.
Partition #3 contains a LVM2_member signature.

Do you want to remove the signature? [Y]es/[N]o: N

Command (m for help): p

Disk /dev/nvme0n1: 3.64 TiB, 4000787030016 bytes, 7814037168 sectors
Disk model: CT4000P3SSD8
Units: sectors of 1 * 512 = 512 bytes
Sector size (logical/physical): 512 bytes / 512 bytes
I/O size (minimum/optimal): 512 bytes / 512 bytes
Disklabel type: gpt
Disk identifier: 6D06B1F4-8489-4C56-92D3-1EFCA1183DBD

Device           Start        End    Sectors  Size Type
/dev/nvme0n1p1      34       2047       2014 1007K BIOS boot
/dev/nvme0n1p2    2048    1050623    1048576  512M EFI System
/dev/nvme0n1p3 1050624 7814037134 7812986511  3.6T Linux filesystem

Command (m for help): t
Partition number (1-3, default 3):
Partition type or alias (type L to list all): 30

Changed type of partition 'Linux filesystem' to 'Linux LVM'.

Command (m for help): p
Disk /dev/nvme0n1: 3.64 TiB, 4000787030016 bytes, 7814037168 sectors
Disk model: CT4000P3SSD8
Units: sectors of 1 * 512 = 512 bytes
Sector size (logical/physical): 512 bytes / 512 bytes
I/O size (minimum/optimal): 512 bytes / 512 bytes
Disklabel type: gpt
Disk identifier: 6D06B1F4-8489-4C56-92D3-1EFCA1183DBD

Device           Start        End    Sectors  Size Type
/dev/nvme0n1p1      34       2047       2014 1007K BIOS boot
/dev/nvme0n1p2    2048    1050623    1048576  512M EFI System
/dev/nvme0n1p3 1050624 7814037134 7812986511  3.6T Linux LVM

Command (m for help): w
The partition table has been altered.
Syncing disks.
As you can see, all the defaults were OK in re-creating the new partition table. We must only set the partition type (t) to 30 (Linux LVM)
We can check the new partition table
root@pve3:~# sfdisk -d /dev/nvme0n1
label: gpt
label-id: 6D06B1F4-8489-4C56-92D3-1EFCA1183DBD
device: /dev/nvme0n1
unit: sectors
first-lba: 34
last-lba: 7814037134
sector-size: 512

/dev/nvme0n1p1 : start=          34, size=        2014, type=21686148-6449-6E6F-744E-656564454649, uuid=40F0D63F-33A4-40A3-8547-C9747E3DD8F6
/dev/nvme0n1p2 : start=        2048, size=     1048576, type=C12A7328-F81F-11D2-BA4B-00A0C93EC93B, uuid=A150376E-A003-4C05-AE41-28E6170D7AC6
/dev/nvme0n1p3 : start=     1050624, size=  7812986511, type=E6D6D379-F507-44C2-A23C-238F2A3DF928, uuid=FCD0E153-944A-BD4E-A82A-D47A8C4291B8
- Now that the partition table reflects the new size, we can resize the LVM PV and check the new free space
root@pve3:~# pvresize /dev/nvme0n1p3
  Physical volume "/dev/nvme0n1p3" changed
  1 physical volume(s) resized or updated / 0 physical volume(s) not resized
root@pve3:~# vgdisplay pve
  --- Volume group ---
  VG Name               pve
  System ID
  Format                lvm2
  Metadata Areas        1
  Metadata Sequence No  491
  VG Access             read/write
  VG Status             resizable
  MAX LV                0
  Cur LV                14
  Open LV               9
  Max PV                0
  Cur PV                1
  Act PV                1
  VG Size               <3.64 TiB
  PE Size               4.00 MiB
  Total PE              953733
  Alloc PE / Size       82142 / <320.87 GiB
  Free  PE / Size       871591 / 3.32 TiB
  VG UUID               1HhlCb-UbmY-1Smz-eEEa-YmzS-qdIB-YK3WoY
Cool, the Free Size shows 3.32 TiB unused space.
Let’s check the current data allocation
root@pve3:~# lvs
  LV                VG         Attr       LSize   Pool Origin Data%  Meta%  Move Log Cpy%Sync Convert
  cephusbdata1      USB        -wi-ao----   1.95t
  bluestore-block1  patriot-vg -wi-ao---- 370.00g
  bluestore-block2  patriot-vg -wi-ao---- 370.00g
  patriot-tmp       patriot-vg -wi-ao----  75.00g
  bluestore-db-usb1 pve        -wi-ao----  80.00g
  bluestore-db1     pve        -wi-ao----  30.00g
  bluestore-db2     pve        -wi-ao----  30.00g
  data              pve        twi-aotz-- 154.00g             61.59  21.42
  root              pve        -wi-ao----  20.25g
  swap              pve        -wi-ao----   6.12g
  vm-112-disk-0     pve        Vwi-a-tz--  10.00g data        99.42
  vm-113-disk-0     pve        Vwi-aotz--  12.00g data        100.00
  vm-122-disk-0     pve        Vwi-aotz--   4.00g data        99.65
  vm-129-disk-0     pve        Vwi-aotz--  32.00g data        96.14
  vm-203-disk-0     pve        Vwi-aotz--  16.00g data        99.23
  vm-223-disk-0     pve        Vwi-a-tz--   8.00g data        30.92
  vm-303-cloudinit  pve        Vwi-a-tz--   4.00m data        9.38
  vm-303-disk-0     pve        Vwi-a-tz--  20.00g data        99.02
We’re only interested in the bluestore-* and cephusbdata1 since they are not in the pve VG. The USB VG is on a slow USB disk, and the partriot-vg is on an aging old SATA SSD. I want to move everything to the new NVMe, so in the pve VG.
Since NVMe is faster, I won’t split the bluestore-block and bluestore-db to different devices. I’ll create a new big OSD on a new LV with data block, db (and WALL) on the same LV.
Create a new LV for the Ceph bluestore OSD
root@pve3:~# lvcreate -L 3300G -n bluestore-nvme pve
  Logical volume "bluestore-nvme" created.
Create the new OSD
root@pve3:~# ceph-volume lvm prepare --data pve/bluestore-nvme
Running command: /usr/bin/ceph-authtool --gen-print-key
Running command: /usr/bin/ceph --cluster ceph --name client.bootstrap-osd --keyring /var/lib/ceph/bootstrap-osd/ceph.keyring -i - osd new f13c6fe2-80a1-4da7-866e-e15493f23b5b
Running command: /usr/bin/ceph-authtool --gen-print-key
Running command: /usr/bin/mount -t tmpfs tmpfs /var/lib/ceph/osd/ceph-9
--> Executable selinuxenabled not in PATH: /usr/local/sbin:/usr/local/bin:/usr/sbin:/usr/bin:/sbin:/bin
Running command: /usr/bin/chown -h ceph:ceph /dev/pve/bluestore-nvme
Running command: /usr/bin/chown -R ceph:ceph /dev/dm-21
Running command: /usr/bin/ln -s /dev/pve/bluestore-nvme /var/lib/ceph/osd/ceph-9/block
Running command: /usr/bin/ceph --cluster ceph --name client.bootstrap-osd --keyring /var/lib/ceph/bootstrap-osd/ceph.keyring mon getmap -o /var/lib/ceph/osd/ceph-9/activate.monmap
 stderr: 2023-05-08T19:34:25.969+0200 7fe8b6e93700 -1 auth: unable to find a keyring on /etc/pve/priv/ceph.client.bootstrap-osd.keyring: (2) No such file or directory
2023-05-08T19:34:25.969+0200 7fe8b6e93700 -1 AuthRegistry(0x7fe8b0060800) no keyring found at /etc/pve/priv/ceph.client.bootstrap-osd.keyring, disabling cephx
 stderr: got monmap epoch 6
--> Creating keyring file for osd.9
Running command: /usr/bin/chown -R ceph:ceph /var/lib/ceph/osd/ceph-9/keyring
Running command: /usr/bin/chown -R ceph:ceph /var/lib/ceph/osd/ceph-9/
Running command: /usr/bin/ceph-osd --cluster ceph --osd-objectstore bluestore --mkfs -i 9 --monmap /var/lib/ceph/osd/ceph-9/activate.monmap --keyfile - --osd-data /var/lib/ceph/osd/ceph-9/ --osd-uuid f13c6fe2-80a1-4da7-866e-e15493f23b5b --setuser ceph --setgroup ceph
 stderr: 2023-05-08T19:34:26.185+0200 7f9bf435e240 -1 bluestore(/var/lib/ceph/osd/ceph-9/) _read_fsid unparsable uuid
--> ceph-volume lvm prepare successful for: pve/bluestore-nvme
You can check with ceph status, ceph osd status and via the PVE GUI that you have a new OSD running. It’s new and not up yet.
Activate the new OSD
When creating the OSD, we noticed that it was number 9. Take the fsid and activate it.
root@pve3:~# cat /var/lib/ceph/osd/ceph-9/fsid
f13c6fe2-80a1-4da7-866e-e15493f23b5b
root@pve3:~# ceph-volume lvm activate 9 f13c6fe2-80a1-4da7-866e-e15493f23b5b
Running command: /usr/bin/chown -R ceph:ceph /var/lib/ceph/osd/ceph-9
Running command: /usr/bin/ceph-bluestore-tool --cluster=ceph prime-osd-dir --dev /dev/pve/bluestore-nvme --path /var/lib/ceph/osd/ceph-9 --no-mon-config
Running command: /usr/bin/ln -snf /dev/pve/bluestore-nvme /var/lib/ceph/osd/ceph-9/block
Running command: /usr/bin/chown -h ceph:ceph /var/lib/ceph/osd/ceph-9/block
Running command: /usr/bin/chown -R ceph:ceph /dev/dm-21
Running command: /usr/bin/chown -R ceph:ceph /var/lib/ceph/osd/ceph-9
Running command: /usr/bin/systemctl enable ceph-volume@lvm-9-f13c6fe2-80a1-4da7-866e-e15493f23b5b
 stderr: Created symlink /etc/systemd/system/multi-user.target.wants/ceph-volume@lvm-9-f13c6fe2-80a1-4da7-866e-e15493f23b5b.service → /lib/systemd/system/ceph-volume@.service.
Running command: /usr/bin/systemctl enable --runtime ceph-osd@9
 stderr: Created symlink /run/systemd/system/ceph-osd.target.wants/ceph-osd@9.service → /lib/systemd/system/ceph-osd@.service.
Running command: /usr/bin/systemctl start ceph-osd@9
--> ceph-volume lvm activate successful for osd ID: 9
After activating it, the ceph osd status will show the new OSD in STATE exists,up
Proceed to other nodes
Repeat the above procedure on the other nodes.
Rebalance
root@pve3:~# ceph osd unset norebalance
norebalance is unset
root@pve3:~# ceph osd unset noout
noout is unset
The rebalance process will immediately start. Note we have a much bigger Ceph storage capacity with the new added OSD.
It will take up to the maximum bandwidth available, and slow down to give priority to the ceph cluster activity.
Reweight the old OSDs
Instead of marking them out, I’ll reweight them to 0.00, to first empty them and speed up the rebalance process.
Use ceph osd reweight <osdid> 0.00 for all the OSDs to be removed.
root@pve3:~# for x in {0..8}; do echo ceph osd reweight $x 0.00; done;
ceph osd reweight 0 0.00
ceph osd reweight 1 0.00
ceph osd reweight 2 0.00
ceph osd reweight 3 0.00
ceph osd reweight 4 0.00
ceph osd reweight 5 0.00
ceph osd reweight 6 0.00
ceph osd reweight 7 0.00
ceph osd reweight 8 0.00
root@pve3:~# ceph osd reweight 0 0.00
ceph osd reweight 1 0.00
ceph osd reweight 2 0.00
ceph osd reweight 3 0.00
ceph osd reweight 4 0.00
ceph osd reweight 5 0.00
ceph osd reweight 6 0.00
ceph osd reweight 7 0.00
ceph osd reweight 8 0.00
reweighted osd.0 to 0 (0)
reweighted osd.1 to 0 (0)
reweighted osd.2 to 0 (0)
reweighted osd.3 to 0 (0)
reweighted osd.4 to 0 (0)
reweighted osd.5 to 0 (0)
reweighted osd.6 to 0 (0)
reweighted osd.7 to 0 (0)
reweighted osd.8 to 0 (0)
root@pve3:~#
root@pve3:~# ceph osd status
ID  HOST   USED  AVAIL  WR OPS  WR DATA  RD OPS  RD DATA  STATE
 0  pve2     0      0       0        0       0        0   exists,up
 1  pve1     0      0       0        0       0        0   exists,up
 2  pve3     0      0       0        0       0        0   exists,up
 3  pve1     0      0       0        0       0        0   exists,up
 4  pve3     0      0       0        0       0        0   exists,up
 5  pve2     0      0       0        0       0        0   exists,up
 6  pve1     0      0       0        0       0        0   exists,up
 7  pve3     0      0       0        0       0        0   exists,up
 8  pve2     0      0       0        0       0        0   exists,up
 9  pve3   332G  2967G     20      112k      1     2457   exists,up
10  pve2   332G  2967G     16      135k      0     6553   exists,up
11  pve1   294G  3005G      2      686k      0       20   exists,up
I used the first command just to print, check, then copy/paste the output to the console to apply.
Alternatively, you can use the ceph osd crush reweight. Example to generate commands ready for copy/paste:
for x in {0..8}; do echo ceph osd crush reweight osd.$x 0; done;This will now take hours or days for all the data to be migrated to the new OSDs.
You should have a HEALTH_OK status
root@pve3:~# ceph status
  cluster:
    id:     e7628d51-32b5-4f5c-8eec-1cafb41ead74
    health: HEALTH_OK

  services:
    mon: 3 daemons, quorum pve1,pve3,pve2 (age 55m)
    mgr: pve1(active, since 55m), standbys: pve3, pve2
    mds: 1/1 daemons up, 2 standby
    osd: 12 osds: 12 up (since 24m), 3 in (since 20m); 195 remapped pgs

  data:
    volumes: 1/1 healthy
    pools:   10 pools, 229 pgs
    objects: 1.04M objects, 1.2 TiB
    usage:   976 GiB used, 8.7 TiB / 9.7 TiB avail
    pgs:     4166448/3108540 objects misplaced (134.032%)
             160 active+clean+remapped
             35  active+remapped+backfilling
             33  active+clean
             1   active+clean+snaptrim

  io:
    client:   325 KiB/s rd, 1.3 MiB/s wr, 4 op/s rd, 21 op/s wr
    recovery: 112 MiB/s, 69 keys/s, 85 objects/s
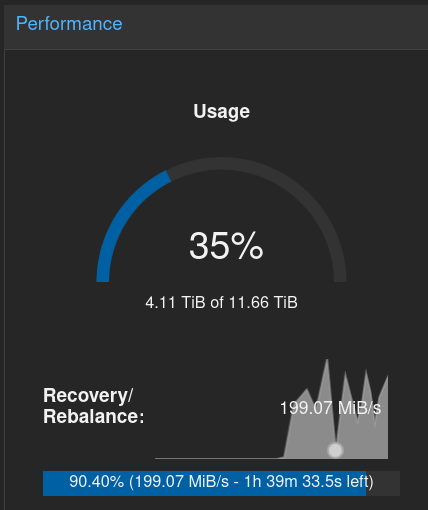
Monitoring
I mostly use the ceph -w command, and the PVE GUI, but you might find more appropriate commands in the documentation for your case. The PVE GUI is quite basic, and the recovery/rebalance time is always wrong.
After some time, you should get something like
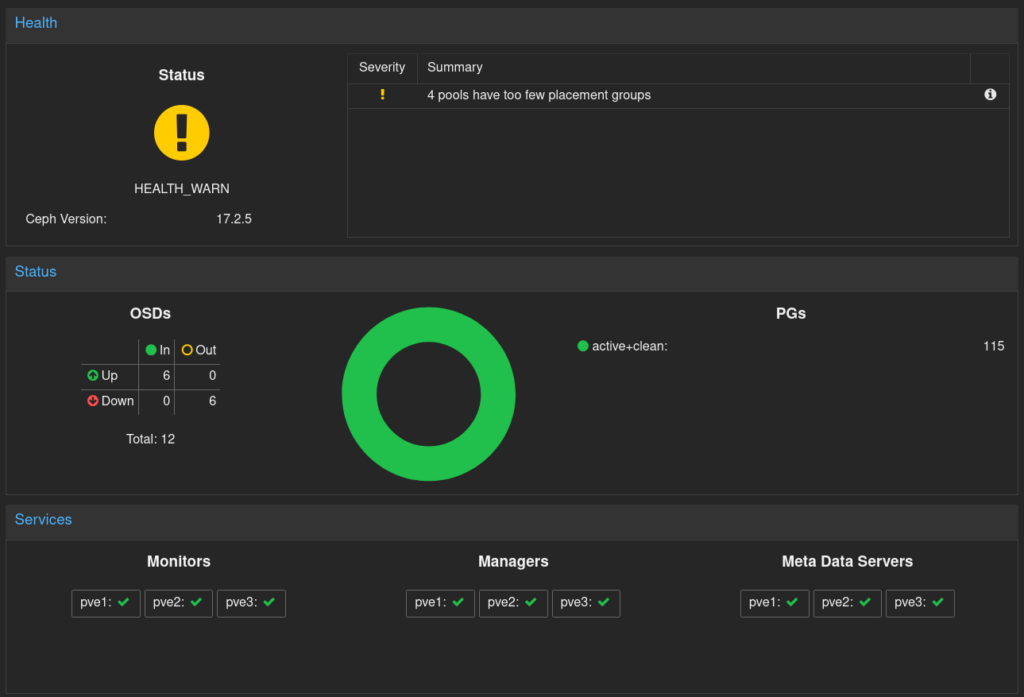
The ‘4 pools have too few placement groups’ message is just because I did set the autoscaling in warn mode, and all the OSDs are still present.
Remove the old OSDs
It’s now time to set the old OSDs to out is not already, and check that the health is still OK. Then progressively shut them down, monitoring the health status. You can do everything from the PVE GUI but for some operations you might have to log in using root / PAM.
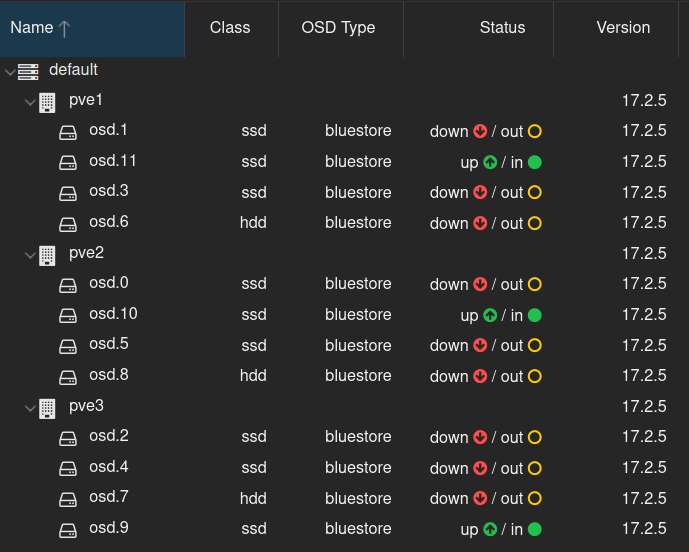
If health do not show any problem, you can select the old OSDs (down) and destroy them from the GUI. It will propose you to clean-up disks.

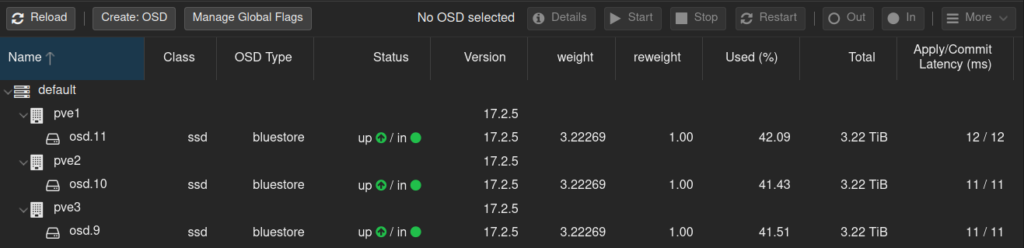
And keep only the new OSDs
Tuning
If you have a very large pool, you can activate the bulk flag for that pool. In my case :
root@pve3:~# ceph osd pool set cephfs_data bulk true
set pool 2 bulk to true
root@pve3:~# ceph osd pool autoscale-status
POOL                   SIZE  TARGET SIZE  RATE  RAW CAPACITY   RATIO  TARGET RATIO  EFFECTIVE RATIO  BIAS  PG_NUM  NEW PG_NUM  AUTOSCALE  BULK
.mgr                 40192k                3.0         9900G  0.0000                                  1.0       1              on         False
cephfs_metadata      839.0M                3.0         9900G  0.0002                                  4.0      16              on         False
cephblock            307.0G                3.0         9900G  0.0930                                  1.0      16              off        False
cephfs_data_cache    52606M       51200M   2.0         9900G  0.0104                                  1.0       2              off        False
.rgw.root             1327                 3.0         9900G  0.0000                                  1.0       4          32  warn       False
default.rgw.log        182                 3.0         9900G  0.0000                                  1.0       4          32  warn       False
default.rgw.control      0                 3.0         9900G  0.0000                                  1.0       4          32  warn       False
default.rgw.meta         0                 3.0         9900G  0.0000                                  4.0       4          32  warn       False
cephfs_data           1041G                3.0         9900G  0.3156                                  1.0      64              off        True
Wait for autoscaler to compute new numbers from the new OSD count, then enable the autoscaler back on.
Possible problems
Running out of PGs
If you reduce the number of OSD, and you have more PG allocated than the max_pg_per_osd. I had the problem because I had autoscale on, and ceph does not remove the out OSDs from the max PG count to compute the number of PGs for each pool. Also, I did set a ratio which takes precedence. So, I had to switch off autoscale, disable the target ratio, and adjust the PG number for some pools to match the default max 100 PG/OSD.
Useful commands:
ceph osd pool autoscale-status                     # Check PGs and autoscale recommendations.
ceph osd pool set {pool-name} target_size_ratio 0  # Disable the TARGET RATIO
ceph osd pool autoscale-statusceph osd pool set {pool-name} pg_num 64
ceph osd pool autoscale-statusceph osd pool set {pool-name} pgp_num 64 # You need to adjust both pg & pgp for the rebalance to occur.
ceph osd down {osd-num}
ceph osd dump | grep repli
The PG adjustments for pools might take time, and might occur after rebalancing (be patient).
PG stuck in rebalancing
First reweighting the OSDs should prevent rebalancing problems
But if you created a CRUSH rule like the one proposed in Extend a Ceph cluster with slower HDD disks using SSD cache-tiering, and you want to remove OSDs enforced by that rule, you might have to ensure all pools are back on the default replicated_rule.
OSD services remain active at startup
Or : How to remove an unwanted or failed Ceph service due to entering a wrong name
This has no consequences, but if you do not want them in your startup logs any more, you might have to remove them manually.
WARNING with the below command, make sure you grep -v the osd id you want to keep. (test without the xargs part)
root@pve1:~# ps -ef | grep osd
ceph        3266       1 12 16:18 ?        00:17:10 /usr/bin/ceph-osd -f --cluster ceph --id 11 --setuser ceph --setgroup ceph
root       89661   66392  0 18:38 pts/1    00:00:00 grep osd
root@pve1:~# ls -1 /etc/systemd/system/multi-user.target.wants/ | grep ceph-volume | grep -v lvm-11- | xargs systemctl disable
Removed /etc/systemd/system/multi-user.target.wants/ceph-volume@lvm-0-1d645695-bed4-42df-aa29-e7381d5afa59.service.
Removed /etc/systemd/system/multi-user.target.wants/ceph-volume@lvm-3-94d08df1-7c9e-4072-b5ba-e5399c1e77c7.service.
Removed /etc/systemd/system/multi-user.target.wants/ceph-volume@lvm-1-d3ab1ea9-e3db-426a-abe2-4000415decc5.service.
Removed /etc/systemd/system/multi-user.target.wants/ceph-volume@lvm-1-5501a4e2-67dc-4dfc-8510-f65920b18b2c.service.
Removed /etc/systemd/system/multi-user.target.wants/ceph-volume@lvm-0-7d865311-bf42-45cf-bc76-307f2452384d.service.
Removed /etc/systemd/system/multi-user.target.wants/ceph-volume@lvm-6-de79485d-414d-40aa-8290-83db26292a39.service.
Removed /etc/systemd/system/multi-user.target.wants/ceph-volume@lvm-3-0ee6fad6-cba7-48b4-8c3a-430190be03d2.service.
Removed /etc/systemd/system/multi-user.target.wants/ceph-volume@lvm-1-08566904-6f0e-4afd-ab25-079359feb0bd.service.
Removed /etc/systemd/system/multi-user.target.wants/ceph-volume@lvm-5-3dba44fa-599f-4056-9c9d-2eefc475ed96.service.
Benchmark
You might like to benchmark your setup. You’ll find many fio command lines looking like this
fio --filename=/mnt/pve/cephfs/backup/postgresql/bench/bench.file --size=128GB --direct=1 --rw=randrw --bs=4k --ioengine=libaio --iodepth=1 --runtime=120 --numjobs=4 --time_based --group_reporting --name=iops-test-job --eta-newline=1
Don’t be surprised if you compare with a native disk, that’s a network cluster !
Also, the above command can quickly make ceph-osd crashes, especially if you use high iodepth and numjobs. Increase the size according to your HW performance.